
Summary – With the recent implementation of Google’s Web Vitals, I’ve experienced an influx of requests from new clients to fix their Divi CLS scores. Their search rankings have plummeted, causing drastic drops in traffic and potential revenue. In this article I demonstrate my proven process to reduce your Divi CLS to zero. I will walk you through the process of identifying the Divi CLS offenders and how to affect the changes required to reduce your Divi CLS to zero.
Note: Although I focus on the Divi theme, the knowledge and process I share throughout this tutorial series works for any website, regardless of theme or build.
Welcome to Part 3 of my Fix Divi CLS tutorial series! In my previous articles we covered why you need to reduce your CLS score, the root causes of Divi CLS, and available tools to help you reduce your Divi CLS to zero. In this article, the rubber hits the road as I demonstrate my proven process to reduce your Divi CLS to zero. I will be using my new website menu header build as a case study. I will walk you through the process of identifying Divi CLS element offenders, and how to affect the changes required to get your Divi CLS to zero.
Divi CLS To Zero Case Study – Before and After.
Before we jump in, lets take a look at my starting and ending Divi CLS results. This provides a baseline to measure the effectiveness of the process. These images are taken from Chrome Developer’s Tools Lighthouse report
-
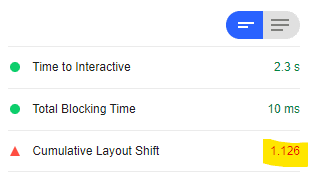
- Before
-
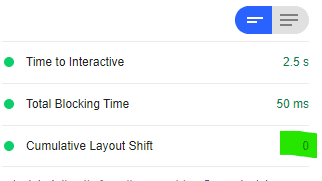
- After
Step 1: Divi CLS to Zero – Identify the Offenders
This is by far the most time consuming and difficult part of the process. For an existing webpage you will need to use the available tools (JavaScript Console, Chrome Developer Tools) to deconstruct the problem areas. If you do not have the JavaScript console script implemented, you can follow my instructions in Part 2 of this series, Tools to Fix Divi CLS.
Here are the steps I took to reduce my Divi CLS to Zero; you can do the same:
- Open the webpage in an incognito window to bypass logged in status and emulate what a google bot sees and visitor experiences.
- Open Chrome Developer Tools (keyboard F12 or Shift I). Focus on the Console log and the Performance Tab outputs.
- Click the Performance Tab reload to start profiling the page. When the process completes, review the console log output and the ‘Experience’ row of the performance profile to see the recorded layout shifts.
- Click on the red bar of the ‘Experience’ row to view the detailed results in the ‘Summary’ window below the profile data. Hover over each of the recorded shifts “Moved From” and “Moved To” to see the layout shift colored overlay on the webpage view window. This will give you a visual of where the layout shift happened for each grouping.
I had one large grouping with 4 identified elements. They were:
1. The logo image in the menu.
Moved From:![]()
Moved To:![]()
The data and overlay show the element move down. In addition there is a height/width growth of the element if my Add Height and Width to Divi Images Plugin is disabled (you can read more about my custom plugins to help fix Divi CLS later in this article).
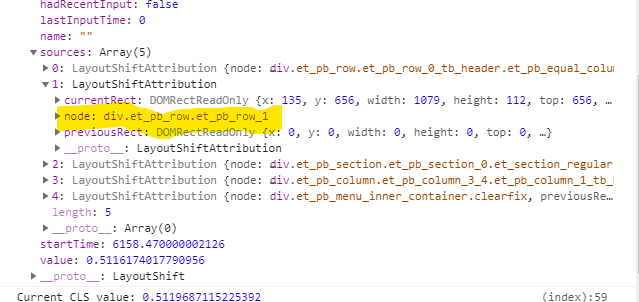
2. Row 0 in Header.
Moved From: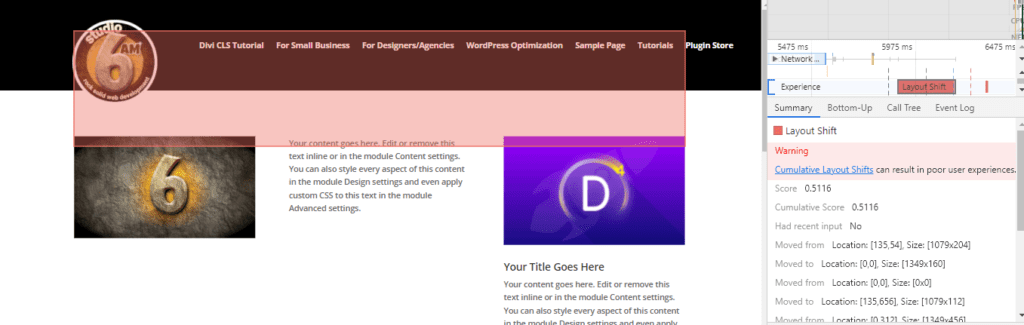
Moved To: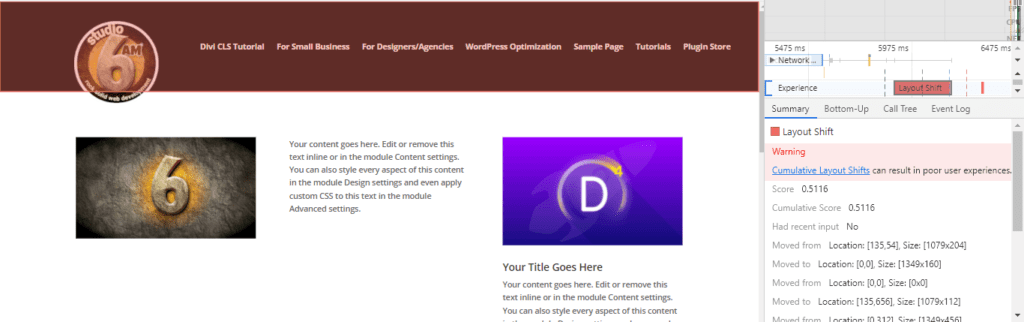
The data and overlay clearly show the row’s width change to 100% of the browser window and moved to the top of the window.
3. Section 0 of the Body (under the header).
Moved From: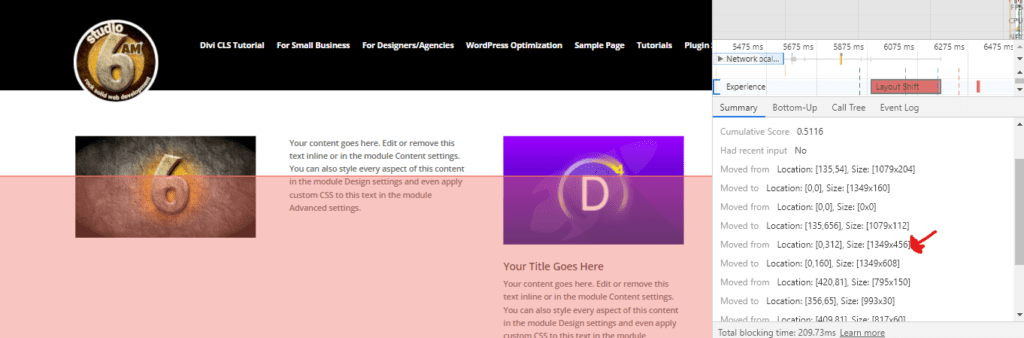
Moved To: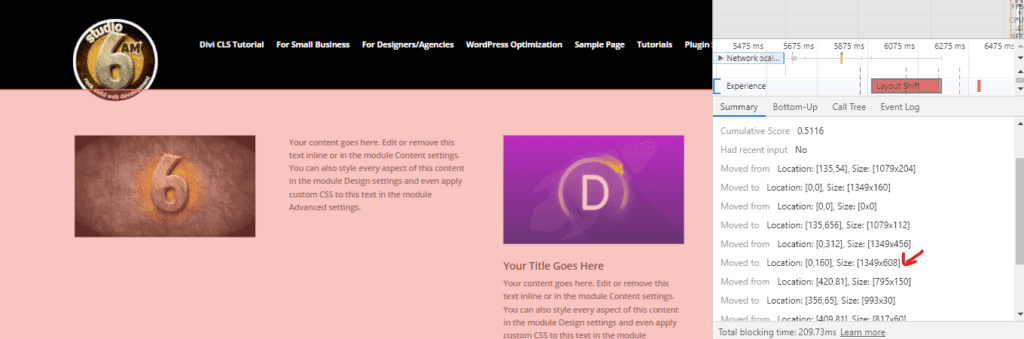
The data clearly shows the section move up the browser window and settled directly under the header.
4. Multiple small individual menu item shifts in the Header (only one shown below).
Moved From: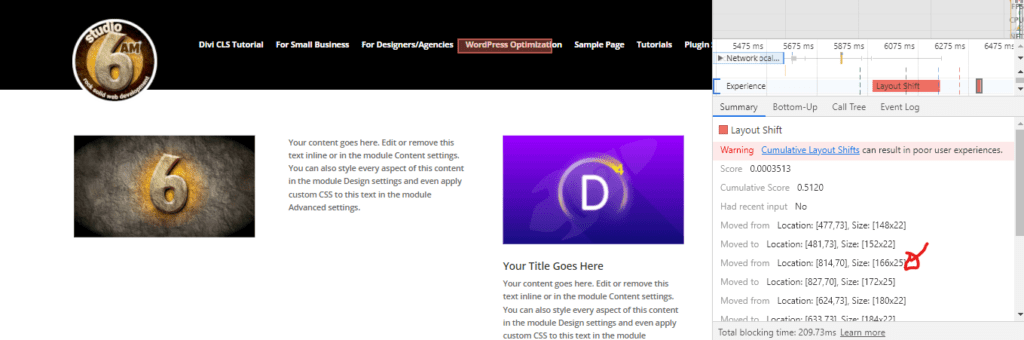
Moved To: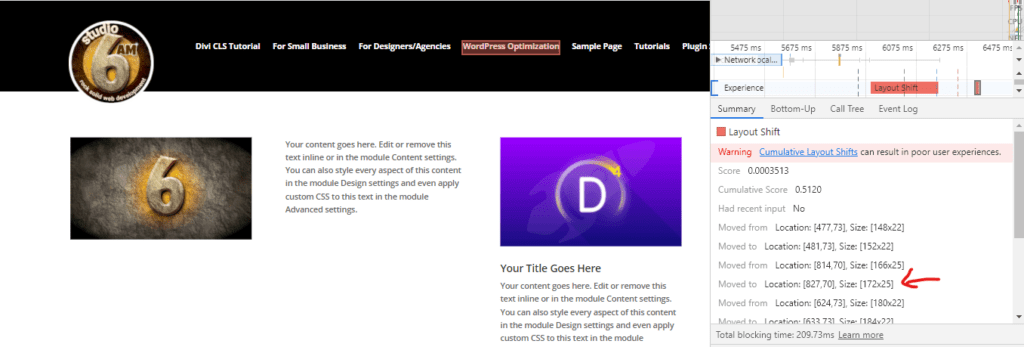
The data shows a small growth in width/height of the menu text elements.
Step 2: Divi CLS to Zero – Fix the Offenders
Important: Before attempting any fix, ensure you disable all webpage caching (including Cloudfare if you have it) and you are viewing the webpage in an incognito window or you may not see the changes.
This is where the JavaScript Console output comes in handy as you can traverse the recorded array and find detailed information regarding each element in the DOM that has shifted. Once the items have been isolated, the recorded ‘node’ is what we are after.
1. Click on the node to be taken to the ‘Elements’ window and inspect the element’s associated CSS source as shown here. You are looking for any references of that node that show ‘index’ as opposed to the default Divi style sheet or your Child Theme style sheet as shown here:
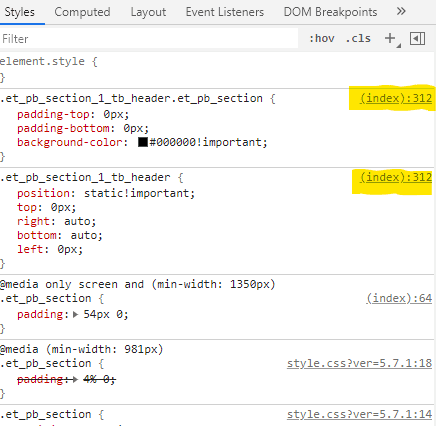
Index means the styling is being rendered inline on the page (in the screen shot above on line 312), which is what we want to pre-empt. It is this inline styling that is the main root cause of Divi CLS.
2. Copy the CSS selector along with it’s style declarations and add this to your Child Theme style sheet. Save, refresh your browser, reinspect the element and you will see your implemented changes:
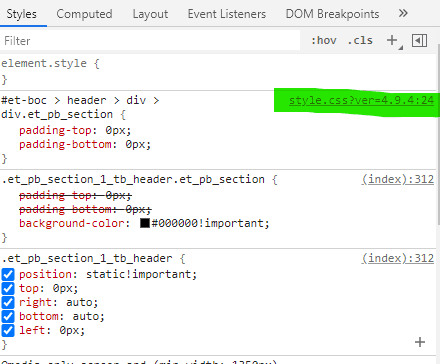
It doesn’t matter if the inline index style declarations have an !important (which is not best practice, but Divi does it all the time). The !important declaration will win out on final styling, but the important thing is that it won’t change the element’s styling on overwrite meaning no Divi CLS!
That’s pretty much it, you have now rectified the Divi CLS offender. Duplicate this process on all of the identified elements and you will have your Divi CLS to zero.
Case Study Specifics – here is exactly what I did.
1. Logo Image in Header:
- First I installed one of my custom plugins to add Divi’s missing height and width values. This cannot be achieved with css (as it is html) and is necessary to ensure that the image container is correctly sized when the browser first paints it to eliminate shifts. Adding explicit width and height attributes to images/videos is a key Google recommendation to reducing your CLS scores as described in Google Web Devs article on Cumulative Layout Shift (CLS). To test the plugin’s CLS reducing effectiveness , I compared the final CLS score (after all other fixes were in play) with and without my plugin active.Without Plugin:
 Note: Score is culmination of all the images above the fold shifting due to lack of width and height attributes.With Plugin (no CLS entries – we are good! ):
 Note: My custom Divi CLS plugins are available for a small fee, and can be accessed soon in my new website’s custom plugin store. If you’d like them before then, just shoot an email to [email protected] and I’ll get them to you.
 - Secondly, I followed the procedure outlined in Step 2 by copying the inline image selector and styling to my Child Theme style sheet .
2. Row 0 in Header:
- To fix the width shift, I copied the selector and css declarations for the row into my Child Theme style sheet.
- As it also shifted up, I recognized that the padding of the parent container (Section 0 of Header) had been set to 0px top and bottom, so I copied that section’s selector and style declarations and added to my Child Theme style sheet.
3. Section 0 of the Body (under the header).
- Because this shifted up and nested directly under the header, I knew it was a result of the padding being removed from an section 0 element rendered above it. In this case, it was the same section of the header as described in point 2 above, so fixing that also corrected this.
4. Header Menu:
Shifts surrounding text elements are a little bit more difficult to diagnose, but small shifts around individual text elements usually indicated a size shift resulting from the font type and/or font size changing from defaults. To fix this I:
- Copied the nav menu > ul > li > a styling and added it to my Child Theme style sheet.
- In addition, because the menu text is typically at the top of the page (first in the DOM) , there is not much time to affect changes to the font. To tackle this issue, I preloaded the font (which I also host locally to avoid Google web font http requests that cause delays) in the head of my page. I accomplished this by adding it to Divi’s “Theme Options-> Integration-> Add code to the < head > of your blog” section like so:
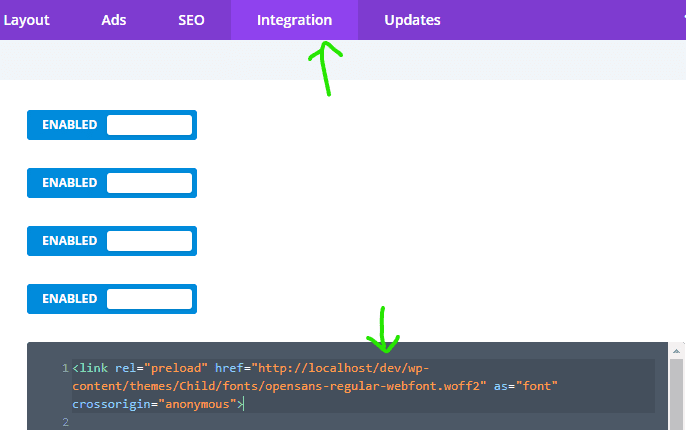
This prioritizes asset loading of the font and eliminates the flash of unformatted text (FOUT). You can read more about FOUT and FOIT in Google Web Dev’s article Prevent layout shifting and flashes of invisible text (FOIT) by preloading optional fonts.
Divi CLS to Zero Case Study – Conclusion
Overall, the process can be time consuming and sometimes tedious but immensely rewarding when you nail it. My advice is to practice, practice, practice, and then practice some more. You will eventually get your Divi CLS to Zero.
If you don’t have the patience, interest, or you have an immediate need due to Google’s Web Vitals implementation, I do offer CLS optimization as a service and would be happy to assist. If so, just shoot me an email at [email protected].
Note: If you email me, I will absolutely respond. Because I use a SMTP relay service, my emails sometimes end up in your junk or promotions folder so make sure to check there if you are expecting a response.
That’s it for now! Subscribe to ensure you don’t miss the next and final article in this tutorial series: Part 4 – Final Tips and Tricks for Fixing Divi CLS. I have literally spent hundreds of hours studying, testing, and perfecting my process to reduce Divi CLS to zero. In my final article of the series I’ll share with you some of my most unique tips and learnings to help you get there much faster, not to mention save on the inevitable hair pulling.
Until then Happy Optimizing!

0 Comments